Saturday, October 22, 2016

Outdoor Halloween Movie Night


Ticket for one to Fright Night please! It's no secret that Halloween is big over here, have you checked out my post on our Halloween decorations this year? You can see those pictures by clicking here.
But back to the party...instead of our usual family friendly Halloween party I had an outdoor Halloween movie night for the boys and a few friends. It was an incredibly easy party to set up and host. Unfortunately I had a major phone malfunction earlier this year and lost all my pictures of this party so I will try and set the scene through words

What You Need:
-child friendly Halloween movie
-large white sheet or inflatable screen (these can be rented), laptop, projector, and speakers
-inflatable pool filled with pillows and blankets and/or lawn chairs
-lots of popcorn with candy eyeballs, gummy worms, and candy knives
-optional: bonfire for roasting s'mores
.
Orange and black pumpkin luminaries lined the driveway and led our guests to the back patio where they were greeted by life size mummies and a cozy bonfire. Our 5ft tall skeletons were in their best attire (top hats and bow ties) and hanging out in the covered patio where the table was set for dinner. A black table cloth, with black napkins rolled in a spider ring, black cups with googly eyes glued on and black and white straws with bats awaited the boys. Cheese pizza, fruit, veggies, and an amazing display of doughnut eyeballs that one of the moms made and brought were on the menu.

After dinner the boys got to run around and play while I got the movie started. We used our usual bungee cords strung between the trees with a large white sheet. I had the inflatable pool blown up and filled with pillows and blankets alongside our outdoor furniture and cozy campfire going. Once the boys got some energy out they happily sat down to watch the movie while I handed out the popcorn. We finished the night off making s'mores and letting the boys play hide n seek in the dark with glow sticks (hint:if you ever need glow sticks always go to Dollar Tree so you aren't paying more than a dollar!)

This was such a fun party that I will definitely do it again and make sure my pictures don't disappear.

Also, there is two more days left to enter my instagram free giveaway! If you haven't stopped by yet, check it out! 

 For more of my party ideas, home decorating, favorite recipes, twin activities x 2, and all things
"Mrs.Party Planner" please check me out on facebook and "like" the page. New blog posts will appear in your news feed.You can also follow me on www.bloglovin.com, on Instagram and Pinterest


Friday, October 21, 2016

Have you BOOED your neighbors?

Happy Friday! This is such a cute and easy way to bring some holiday joy to the neighborhood kids. Or even help connect the neighbors.

You can make your own "We've Been Booed" signs or you can print this adorable one for free like I did from Heidi at Happiness is Homemade. Then simply fill a bag or treat bucket with goodies and leave it at your neighbors door step without them knowing it was you. Part of the fun is to guess who booed you.  On the back of the "We've been Booed" sign are instructions for your neighbors to hang their sign in the window so neighbors know they have been booed and make two copies of the sign so they can keep it going and boo two more neighbors.

I filled a plastic pumpkin I already had with some chocolate, Halloween pencils, stickers, window gel clings, fake mustaches, and stretchy skeletons all from Targets Dollar Spot.

What about you? Have you been booed? Feel free to share what you did to BOO your neighbors!


I currently am hosting a giveaway on Instagram until Monday, so stop by and check it out to win! All you have to do is follow me, like the post, and tag a friend or two. Must be a US resident.

For more of my party ideas, home decorating, favorite recipes, twin activities x 2, and all things
"Mrs.Party Planner" please check me out on facebook and "like" the page. New blog posts will appear in your news feed.You can also follow me on www.bloglovin.com, on Instagram and Pinterest

Monday, October 17, 2016

Halloween Home Decor

 This October I finally got to decorate our new home for Halloween! Last year our house was on the market so there was no decorating and my kids were bummed. This year the decor started going up the first of day of October. If you haven't looked at Grandin Road for home decor or visited their famous Halloween Haven I encourage you to do so. They have all kinds of fun and spooky things like these mummies, skeletons, and door mat.

C'mon on in and Mr. Bones is happy to show you the rest of our happily haunted home....


 Once you walk in, come join the party! I think they are celebrating that Halloween is near....


Our buffet table is full of pumpkins, leaves, spiders, and talking heads. My boys picked the talking heads out a couple years ago and think they are the best, they drive me batty. 


Cut out paper spiders and tape to the inside of your lampshade for a cute and creepy effect...


When it gets dark the soft orange glow of the lights feels warm and cozy.... 


BOO! Are you scared yet? There is still more...


 When the sun begins to set and the lights turn on.....


Meet Mr. Bones Jr. and his bar cart full party supplies....


And finally, my husband and I waiting for the kids to finish cleaning their rooms....


Have a Happy Halloween!

 For more of my party ideas, home decorating, favorite recipes, twin activities x 2, and all things
"Mrs.Party Planner" please check me out on facebook and "like" the page. New blog posts will appear in your news feed.You can also follow me on www.bloglovin.com, on Instagram and Pinterest


Wednesday, September 28, 2016

BOO BOX

It's no secret that we love Halloween around here! The first weekend of every October my sisters and I would kick off our favorite month with a visit to the haunted house and a pumpkin brew. The pumpkin patch, zoo boo, and our annual Halloween parties always followed. However, many states now separate us so it's time to make a new tradition.

To continue sharing our love of all things Halloween I made two BOO boxes that are going out tomorrow with my nieces and nephews names on them just in time for October 1st!

This year I simply spray painted the inside of the boxes black and used glow in the dark spray paint to write BOO. I then added glow in the dark spider web and a bunch of Halloween goodies from Target Dollar Spot. Glow in the dark necklaces, stickers, a coloring book, monster band aids, gel clings, bath goodies, and Halloween Oreos. I can't wait for them to open these soon and I already have next years box planned!

Have a fun and spooky filled kick off to October this weekend!!

For more of my party ideas, home decorating, favorite recipes, twin activities x 2, and all things
"Mrs.Party Planner" please check me out on facebook and "like" the page. New blog posts will appear in your news feed.You can also follow me on www.bloglovin.com, on Instagram and Pinterest

Wednesday, September 21, 2016

DIY Health and Beauty Recipes (that work)

If you are anything like me, you don't want to waste your time and money buying and trying various products. Thank you consumer reviews. Yes, I am one of those people that reads reviews on everything and for the most part, bases my decision to buy or visit on them. All of the following DIY recipes are ones I use on a consistent basis because they work! And the best part? The ingredients are either already in your cupboard, or can easily be picked up at the grocery store. Many of my friends and family have requested these recipes and all agree, they are keepers! So here you go...

Disclaimer: I am not a doctor. However, I have used these recipes for awhile now and have done my own research on the products and encourage you to do the same. Please consult your doctor if pregnant.
Braggs Apple Cider Vinegar and all these items are available in the grocery store or Target

If you feel a cold coming on, already caught a bug, or just want a nice cup of tea, you need to try this immune boosting tea. Many studies have shown that drinking tea can do wonders for your health. Apple Cider Vinegar (ACV) has been around for ages and has ample usability, one of the most important being that it contains probiotic compounds (the vinegar itself is not a probiotic but the pectin in apples promotes healthy digestion) that can encourage the growth of good intestinal bacteria. However, I would never drink ACV straight as its very acidic and could harm your teeth after continued use. Always dilute with water and again, all you need is a capful. Honey and cinnamon are also two ingredients that have been used for centuries as healing agents in many cultures. These two ingredients together are said to have many health benefits including boosting your immune system and are helpful in clearing the sinuses.

I have made this concoction for years now and swear by it! No, it is not a cure all by any means. But I have personally warded off colds, my husband says it soothes his throat and helps with his sinuses when sick, and friends also use this.  

Immune System Boosting Tea:
*green tea or your favorite flavor of tea
*a capful of Braggs Apple Cider Vinegar
*spoonful of organic honey (I use and prefer the organic Greek honey hasapis but you cannot currently order this online)
*dash of cinnamon

DIY Teeth Whitener: 
This I found on Pinterest a few years ago but have no idea who to give the credit too. The pinner said her dentist told her this trick. And let me tell you, it's the best one yet! This is my most requested DIY beauty recipe once people see my results. And of course it doesn't cost a quarter of what other teeth whitening products or procedures do.

In a small bowl or cup, mix in
*1 teaspoon of baking soda
*1 teaspoon of hydrogen peroxide
*half a teaspoon of water
*a little toothpaste (I use a enough to cover my brush)
 Brush 2 minutes and you will see instant results! Use once a week until you get desired results and then once a month afterward.

DIY Clarifying Shampoo and Rinse:
This amazing hair and scalp revitalizer came from Nastassia over at The Healthy Life. Between hair products and hard water I had been finding a lot of yucky build up on my scalp. But before I went out and purchased some expensive clarifying shampoo I wanted to give this a try. And guess what?! It worked. All the build up was gone. Mix the baking soda shampoo and ACV rinse ahead of time and bring both into the shower. 

First use the baking soda shampoo-
*1 Tablespoon of baking soda
*1 cup of warm water 
*mix together in a squeeze bottle (I use ketchup and mustard squeeze bottles I found at Dollar Tree) and apply
*let sit for 5 minutes (honestly I let it sit for as long as it takes to shave my legs) and rinse with warm water

Now for the Apple Cider Vinegar rinse-
*1 Tablespoon of ACV
*1 cup of warm water
*mix together in squeeze bottle and apply
*let sit for 5 minutes and rinse with COLD water (this seals the cuticle and helps keep in the moisture)

I now do this once a month and have not had any build up. Give it a try and let me know what you think?

Detox Bath:
Whether you are suffering from a cold/flu or just need to De-stress a detox bath is very relaxing. You can Google this and find a variation of recipes. I have always used the most simple one. I honestly don't know if this actually draws out toxins and balances your bodies ph level as many claim it does, but I do know that it takes the stress away. Plus, who doesn't love a hot, relaxing bath. Now the real question is if I should drink a glass of wine with this bath?! :)

 *Run a hot bath (as hot as you can handle)
*throw in a handful of Epsom salts
*1/2 cup of baking soda
*optional: essential oils
Soak for at least 15 minutes

Do you have any DIY health or beauty tricks you swear by and would like to share? I would love to hear them and give them a try!


For more of my party ideas, home decorating, favorite recipes, twin activities x 2, and all things
"Mrs.Party Planner" please check me out on facebook and "like" the page. New blog posts will appear in your news feed.You can also follow me on www.bloglovin.com, on Instagram and Pinterest

Wednesday, September 14, 2016

Under the Sea Mermaid Party


Get ready to dive into the sea for my little mermaids' third birthday! I absolutely love this theme because of the endless amount of cute ideas you can use. In my early party planning days, I did an Under the Sea party for my first set of twins when they turned two, you can check out that party here.

This particular party took place just after summer so the pool was not an option, however, I found other ways to help keep these mermaids and their friends occupied...

The mermaids greeted their guests while standing under a colorful sea creature balloon arch that opened up to a "sea" full of fun. We found the perfect dolphin bounce house from the same local party supply company that made this adorable balloon arch. A sandbox, water table, and child friendly sea creature scavenger hunt was also part of the outdoor fun.

The mermaid costumes are from Chasing Fireflies

This was the highlight of the girls weekend and a splurge since it was our last party before moving out of state.

While bright and bold colors popped up outside on the lawn, the party indoors was more subtle with shades of blue, purple, and green. I made the backdrop out of vinyl tablecloths from Dollar Tree mixed in with sparkly mesh ribbon. I used this picture so you can see how the tablecloths are cut and then braided a few times together at the top.
 

 Jellyfish floated in the air...

Paper lanterns, streamers, ribbon, and hot glue is all it took to make these jellyfish
Pictures of the girls from birth to the present were displayed on a fishing net

The kids' table offered each mermaid a crown, starfish wand, and treasure box full of chocolate gold coins and jewelry.
I purchased the Aeriel crowns from Party City and simply hot glued lavender barrettes (found on clearance at JoAnn Fabrics) and the small starfish (also from JoAnn Fabrics).
The treasure boxes were purchased from Oriental Trading and I spray painted them gold. The large starfish on the wands were bought from Amazon. I hot glued them on a wooden dowel, then added ribbon and a sparkly gem.


adult table decor

The food table consisted of crabwiches (chicken salad filled croissants), octopus dip, fruit cups, sand dollars (potato chips), shells and cheese (homemade macaroni and cheese) ocean water, and an amazing edible starfish and shells dessert spread. My mom and author of the amazing blog What Happens At Grandmas helped out by making these starfish she adapted from Hungry Happenings. She used sugar cookies, icing and crushed up Graham crackers for these starfish. I made the shells using Wilton white chocolate and molds purchased from JoAnn Fabrics. The sand is simply crumbled vanilla cake mix and the mini buckets and sand tools are from Oriental Trading.

Chicken Salad Crabwiches
  

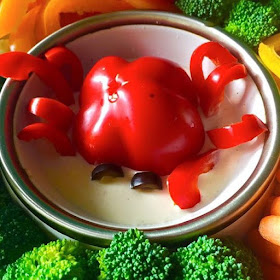
Octopus ranch dip and veggies

Ocean Water aka Blue Hawaiian Punch
Another contribution from my mom was the supplies to make these adorable aquariums.We found the idea on Pinterest. Aquarium rocks, sea weed, shells, plastic fish and sea creatures were carefully selected by each party guest for their own aquarium before we filled the plastic jar with filtered water, glitter, and blue food coloring.


We had a few good hours of fun with lots of bouncing, playing, cake, and presents. Each party goer also took home a "fish in a bag soap". I followed the directions provided by Jessica and Mandy at Little Birdie Secrets. However, if you plan on making these I would suggest adding a large glass of wine and lots of patience to the recipe. It took me plenty of trials before I was able to make anything that slightly resembled theirs.


And what kind of under the sea birthday party would it be without a real fish?! Meet "Fishy" the girls' new pet!


And as usual, most of my parties would not happen without assistance from my wonderful family. As mentioned earlier my mom made the desserts and facilitated the aquarium making while my sister took some great pictures of the party details and party itself! My brother in law and husband helped with the set up and clean up. Thank you everyone!!! This is one of my sisters and her adorable family at the party.

For more of my party ideas, home decorating, favorite recipes, twin activities x 2, and all things
"Mrs.Party Planner" please check me out on facebook and "like" the page. New blog posts will appear in your news feed.You can also follow me on www.bloglovin.com or on Instagram @ mrspartyplanner.


Wednesday, August 31, 2016

volcano terrariums


Need a fun, affordable, and educational activity for a rainy day? Check out our DIY dinosaur terrariums. This project did take place over the course of a few days since we literally didn't feel like watching paint dry. However, if you used a different clay recipe you could complete it in one day.

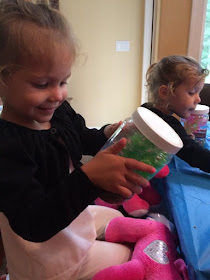
On a visit to Dollar Tree I picked up the medium sized white tubs, which can also be used as a basin for making slime and a variety of other DIY play recipes, visit my Pinterest page for more ideas. The plastic dinosaurs, baking soda, and corn starch were also from Dollar Tree.

The first step was to make our volcano. I used the mini plastic soda bottles as a base since we will be pouring in ingredients to make it "explode". We then made the clay which we molded around the bottle to form a volcano. Once the volcano was made it did take a solid 24hrs for the clay to dry. Once dry, the boys used tempera paint on the clay to paint their volcanoes. Tempura paint can be picked up at any local craft store or on Amazon.
Clay Recipe
2 cups of baking soda
1 cup of corn starch
1 1/2 cups of water
Mix ingredients in saucepan over medium heat, stirring until it is too thick to stir with a spoon.
Let cool for about 15 minutes
Knead the clay for a couple minutes and use. You can also store in plastic wrap until needed.

While the clay was drying the boys and I went outside to collect sticks, rocks, leaves, and anything else we thought would make a good environment for the dinosaurs.


They set up their terrariums with their volcano, dinosaurs, and everything we found outside. The final step was to make the volcano explode which we did with this simple recipe:

 Eruption Experiment
1/4 cup of baking soda
1/4 cup of vinegar (the more vinegar you pour in the more it erupts)
and a squirt of blue Dawn dish soap
red food coloring

The boy's reactions were priceless! After making the volcanoes explode a few times, they played with the terrariums. Easy and fun!
 

Thursday, July 7, 2016

Splashing Into Summer

The wind ruined all my hanging decor, but what can you do? Thankfully it didn't rain.

Another move, a new house, and a pool! I have dreamed of having our own backyard pool since I was eight years old and couldn't be happier. It provides hours of entertainment and lots of fun ideas for parties. Our annual welcome to summer party was a cinch this year!

We had five very sweet boys over at the end of the school year for a few hours of summer fun. Swimming, water balloons, food, and an easy game was all it took for lots of smiles and screams of delight.

Each party guest received a sand pail filled with silly string, bubbles, and snacks. The buckets and goodies were all a dollar a piece from Target and the Dollar Tree. In addition to the snacks I had walking tacos (meat was in a crock pot) and a plate of cut up fruit. And for desert...
Aren't these amazing?!

Can't forget the sugar loaded but colorful Popsicles for a pool party
I had two dozen beach balls all blown up by my husband awaiting the kids in pool but the wind kept blowing them out so I compromised with water balloons. One hundred water balloons to be exact. Thanks to Bunch O Balloons I was able to have all one hundred water balloons filled in less than ten minutes.


The boys had so much fun swimming they didn't want to get out of the pool and that was fine by me. I loved how well they were playing together and entertaining themselves so I just sat on the edge of the pool like a hawk continually counting all seven heads.


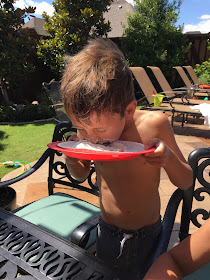
After swimming for a couple hours straight the boys finally emerged to fill their bellies and play a game. Slurping for worms was the perfect pool party game. The boys had to find the gummy worms buried in whip cream using only their mouths. It was a hit and fun to watch. Plus, they were able to swim off some the extra sugar energy.


Another fairly inexpensive, easy, and fun kick off to summer party in the books. And that was just the first day of summer vacation. A lot more summer fun to come! Stay tuned...for more of my party ideas, home decorating, favorite recipes, twin activities x 2, and all things
"Mrs.Party Planner" please check me out on facebook and "like" the page. New blog posts will appear in your news feed.You can also follow me on www.bloglovin.com or on Instagram @ mrspartyplanner.